|
When creating absences and you are looking for a specific student, if you know their pastoral group you can simply select their pastoral group in the Search area and mark them absent as described in the previous section. You may find, however, that using the Name field is more convenient.
The Name field will allow you to quickly perform a number of functions:
| - | See a student’s absence history; |
| - | Record that a student is absent, either for one day or for multiple days; |
| - | Record that a student is late; or |
| - | Record that a student is leaving early. |
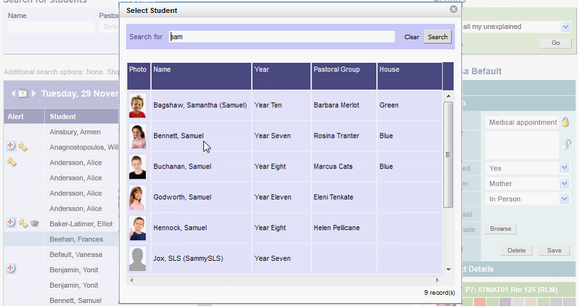
| 1) | Type all or part of a student’s first name or surname into the Name field. It is easier to not type the student’s full name – just the first few letters is enough. |
| 3) | If you haven’t typed the exact name of a student you will then see the Select Student popup. Click on the student you are looking for. |
 If you use a bar code reader with this screen you will skip the student search popup and go straight to the Individual Absence popup. If you use a bar code reader with this screen you will skip the student search popup and go straight to the Individual Absence popup.
4) This popup closes and you see the Individual absence popup.
This popup is divided into 4 areas:

| 1. | Student details: This area identifies the student, gives a quick summary of absence and late totals and shows the student’s current location. |
| 2. | Absence History and Contact Details: This area contains two accordions – The Absence History accordion will display a read only summary of a student’s absences. The Contact Details accordion displays phone and email contact details, including email and SMS links for a student’s carers |
| 3. | Absence detail: The absence detail area is used to enter details of the record you are about to create. The Date fields will default to today. The Arrival time and Departed time fields will default to now but will only be relevant if you click Make Late or Grant Leave. If you are going to click Make Absent you can ignore these fields, even if they are showing a time. |
| 4. | Action buttons: This area is made up of 4 buttons, which you use to show an absence history or to record that the student is absent, late or leaving early. |
| 4) | To use this popup first check the Absence detail area. If you are creating a record for today, and the default absence type is the correct choice for this record, you should not have to enter any additional information. If this is not the case, enter more information as required. |
Remember that the Arrived and Departed times will only be relevant if you click Make Late or Grant Leave. You don’t have to delete the times displayed if you are creating an absence record.
| 5) | To create the record click Make Absent, Make Late or Grant Leave. |
The record created will use the relevant default absence type specified. (Default absence types for whole day absences, late arrival and leave records are specified via Data Entry | Attendance | Types). If you want to create a record using an absence type different from the default, specify it in the Override Default Type field.
This field also has a ‘remember’ icon (the ‘lock’ symbol). This is ideal if you are creating multiple consecutive absences, and you want to use an absence type other than the default.
To view the default absence types in a balloon, hover over the [?] icon.
|

|
| 6) | The popup automatically closes once you click one of the action buttons. |
The Individual Absence popup is used to either show a full absence history or to create new absence records. It is not used to edit existing records. If you click to create a record and one already exists iWise will do the following:
If this type of record already exists:
|
And you click:
|
iWise will:
|
Whole day absence
|
Make absent
|
Alert you to the existing record and ask you to edit it in the main grid.
|
Make late
|
Alert you to the existing record but allow the late record to be created.
iWise allows this so you can manage students who have already been marked absent but now turn up late.
|
Grant leave
|
Alert you to the existing record and ask you to edit it in the main grid.
|
If this type of record already exists:
|
And you click:
|
iWise will:
|
Late record
|
Make absent
|
Alert you to the existing record and ask you to either:
- edit the existing record in the main grid; or
- create a leave record instead of the absence one
|
Make late
|
Alert you to the existing record and ask you to edit it in the main grid.
|
Grant leave
|
Ignore the existing late record and create a new early leave record. The student will then have a late record and an early leave record.
|
If this type of record already exists:
|
And you click:
|
iWise will:
|
Leave record
|
Make absent
|
Alert you to the existing record and ask you to edit it in the main grid.
|
Make late
|
What happens depends on the Arrived, Departed and Expected back times for the existing leave record and for the late record you are trying to create.
If any of the times overlap (ie the time the student is arriving late is before the student is due to return on the existing leave record), then iWise will alert you to the existing record and ask you to edit it in the main grid.
If the times do not overlap, iWise will create the late record, giving the student two lines in the main grid. (A leave record and a late record)
|
Grant leave
|
Again, what happens here depends on the times of the two records. If the times overlap then iWise will alert you to the existing record and ask you to edit it in the main grid.
If the times do not overlap iWise will create the leave record. This means it is possible for a student to have more than one leave record per day.
|
|

