| 1) | To begin each morning, go to Data Entry | Attendance | Swipe In. |
This screen opens in a window of its own, and if you are using it on a swipe station around the school creating a shortcut to this screen may make logging on each morning easier. You don’t need to be logged into iWise to log into this screen.
| 1) | When the screen opens it looks like this: |
|

|
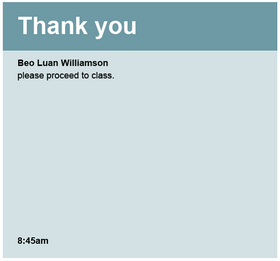
| 1) | As students arrive they swipe their card (or have it read by a barcode reader). |
If they arrive on time they will see this screen:
| 2) | After a few seconds the screen resets itself back to the welcome screen, ready for the next student. |
|
|
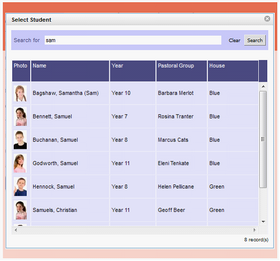
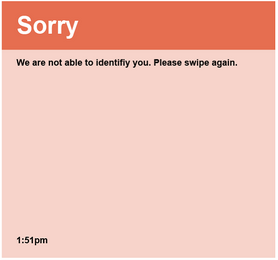
| 1) | If when the student swipes, iWise is not able to identify them, the screen will then show different things depending on which setting you are using: |
|
|
If you are using the swipe screen at front office (swipe setting ON) and iWise is not able to identify the student as they swipe, you will see a popup which allows you to manually select the student.
|
If you are using the swipe screen with the swipe setting OFF the student will be asked to swipe again.
|
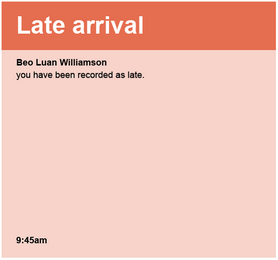
| 2) | If the student is late when they swipe they will be alerted on screen. Again, depending on the swipe setting you are using you will see slightly different screens: |

|
|
With the swipe setting ON the late arrival screen has a field where you can enter a reason for the late arrival, and a Save button to save the record. If you click Cancel, the late record will not be created.
 The Reason field includes the ‘remember’ icon. If you click on this icon, what you enter into the Reason field will be remembered for the next record you create. This is ideal if you are creating records for a large group of students who are all late because of a late bus. The Reason field includes the ‘remember’ icon. If you click on this icon, what you enter into the Reason field will be remembered for the next record you create. This is ideal if you are creating records for a large group of students who are all late because of a late bus.
|
With the swipe setting OFF no late reason is required and there is no Save button. Records are automatically created.
|
If required, a late note can be automatically printed as a student is recorded as late and there is a setting to control this. The setting works independently of Absence_Swipe_Show _Save_Button and is called ABSENCE_SWIPE_PRINT_SLIP.
 iWise settings relevant to absence management. iWise settings relevant to absence management.
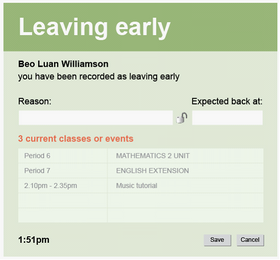
| 3) | After a specified time, if a student has already swiped once today, or if they were present in first period, when they swipe again iWise will assume that they are leaving early. |
iWise will then look to see if the student has any current or future classes or events. If any are found, they will be displayed on screen.
|

|
With the swipe setting ON the early leave screen has a field where you can enter a reason why the student is leaving early, and when they are expected back. The Save button can be used to save the record. If you click Cancel here, the leave record will not be recorded.
|
With the swipe setting OFF no leave reason or time is required and there is no Save button. Records are automatically created.
|
The time the swipe screen switches from creating late records to early leave records for students with a default attendance status of ‘present’ is managed by the iWise setting ABSENCE_ SWIPE_LEAVE_SWITCH.
iWise settings relevant to absence management.
| 1) | If the student then swipes again iWise will record that they are returning to school from their leave. They will see this screen: |
|

|
Reporting on swipe in times
If a student is late or has left early, the time they swiped will appear on the main absence screen – Data Entry | Attendance | Manage.
There is also a report that will show you what time students have swiped in – no matter if they were late or on time, over a date range specified. The report can be in PDF or XLS format.
| 1. | Go to Reports | Directory and to the report HOME | Absence Reports | Swipe In Times |
| 2. | Specify the Date and School Year, as required. |
| 3. | The ‘Overseas’ parameter is used if overseas students are one of your specified groups using this function. |
| 4. | Select the required Output, and Run Report. |
The report looks like this:
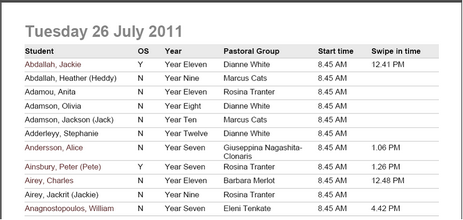
Students who have swiped in late are highlighted in red.
|

